

Pour faire suite à mes articles resteasy-netty et resteasy-netty4, nous allons voir, dans cet article, comment il est possible de créer un service activator avec Spring Integration qui exposera via resteasy-netty4 un service REST.
Ce service REST esposera simplement une opération en POST qui, via Spring Integration, écrira dans un fichier et qui, pour le fun, écrira également sur la console.
Pour ce faire, rien de plus simple, un Service Activator de type gateway a été utilisé.
Cet article montrera donc comment il est possible d’intégrer Spring Integration à notre petite stack basé sur Resteasy-Netty4, Jackson, Metrics, Swagger et Jolokia.
Le code se trouve sur Github ici.
Présentation du usecase
Le service qui est exposé est un service de type REST répondant à un appel de type POST et acceptant du JSON.
Il répondra à une requête de type :
curl -XPOST -H "Content-Type: application/json" -d '{"message": "hello", "time": "2014-03-05T10:55:39.835+01:00"}' http://127.0.0.1:8081/sample/write
et écrira un fichier par requête reçue dans le répertoire /tmp. En outre, il loggera sur la console le message reçu.
Ainsi, avec la commande suivante, on devrait voir un incrément du nombre à chaque réception de message.
watch 'ls *.msg | wc -l'
Mise en oeuvre
Dépendances
A titre informatif, les dépendances ainsi que leurs versions sont les suivantes (au format gradle) :
dependencies {
    compile group: 'org.springframework.integration', name: 'spring-integration-core', version:'3.0.1.RELEASE'
    compile group: 'org.springframework.integration', name: 'spring-integration-jmx', version:'3.0.1.RELEASE'
    compile group: 'org.springframework.integration', name: 'spring-integration-http', version:'3.0.1.RELEASE'
    compile group: 'org.springframework.integration', name: 'spring-integration-file', version:'3.0.1.RELEASE'
    compile group: 'io.netty', name: 'netty-all', version:'4.0.17.Final'
    compile group: 'org.jboss.resteasy', name: 'jaxrs-api', version:'3.0.4.Final'
    compile group: 'org.jolokia', name: 'jolokia-spring', version:'1.1.2'
    compile group: 'com.wordnik', name: 'swagger-jaxrs_2.10', version:'1.3.0'
    compile group: 'com.wordnik', name: 'swagger-annotations_2.10', version:'1.3.0'
    compile group: 'javax.servlet', name: 'servlet-api', version:'2.5'
    compile group: 'com.ryantenney.metrics', name: 'metrics-spring', version:'3.0.0-RC4'
    compile group: 'org.jboss.resteasy', name: 'resteasy-netty4', version:'3.0.6.Final'
    compile group: 'org.jboss.resteasy', name: 'resteasy-jackson-provider', version:'3.0.6.Final'
    compile group: 'commons-configuration', name: 'commons-configuration', version:'1.9'
    compile group: 'commons-collections', name: 'commons-collections', version:'3.2.1'
    compile group: 'commons-io', name: 'commons-io', version:'2.4'
    compile group: 'joda-time', name: 'joda-time', version:'2.3'
    compile(group: 'com.google.guava', name: 'guava', version:'15.0') {exclude(module: 'jsr305')}
}
Pour le lecteur averti, il constatera que la version de Jackson utilisé ici est la 1 (ie. avec le groupId org.codehaus). En effet, Jackson 2 et JodaTime m’ont fait des misères et je n’ai pas réussi à les résoudre rapidement, donc, par flemme, je suis repassé en version 1… ;-)
DTO
Un DTO annoté JAX-B (compris par Jackson) sera utilisé pour représenter le JSON reçu dans le corps du POST.
Il se présente comme suit :
@XmlRootElement
public class DtoRequest {

    private String message;
    private DateTime time;

    public String getMessage() { return message; }

    public void setMessage(String message) { this.message = message; }

    public DateTime getTime() { return time; }

    public void setTime(DateTime time) { this.time = time; }

    @Override
    public String toString() {
        return "DtoRequest{" +
                "message='" + message + '\'' +
                ", time=" + time +
                '}';
    }
}
Ici, la méthode toString() a été overridé car utilisé lors de l’affichage du message par le loggueur sur la console.
Jusque là, ça ne casse pas trois pattes à un canard ;-)
Intégration complète de Spring Integration
Pour rappel, Spring Integration est une implémentation des EIP (Enterprise Integration Patterns) et propose donc une mise en oeuvre de l’architecture Pipes and Filters.
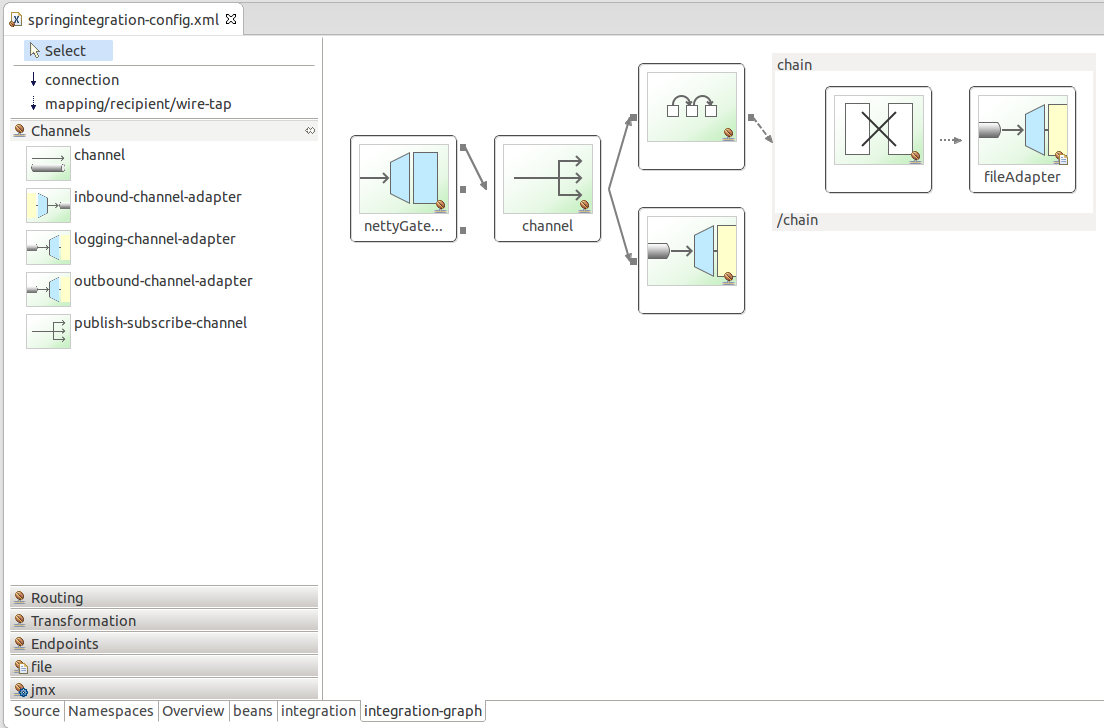
Au niveau écriture dans un répertoire, le file-outbound-adapter offert par Spring Integration sera utilisé :
file:outbound-channel-adapter id="fileAdapter" auto-create-directory="true"
                                       directory="file:${out.directory}"
                                       channel="channel"/>
Coté loggueur, ce sera le composant logging :
<int:logging-channel-adapter auto-startup="true" channel="channel" level="INFO" log-full-message="true"/>
et où on aura un Pipe (channel) en mode Publish-Subscribe :
<int:publish-subscribe-channel id="channel"/>
Au niveau des namespaces et autres informations, on aura ce qui suit :
<?xml version="1.0" encoding="UTF-8"?>
<beans xmlns="http://www.springframework.org/schema/beans"
       xmlns:int="http://www.springframework.org/schema/integration"
       xmlns:file="http://www.springframework.org/schema/integration/file"
       xmlns:xsi="http://www.w3.org/2001/XMLSchema-instance"
       xmlns:int-jmx="http://www.springframework.org/schema/integration/jmx"
       xsi:schemaLocation="http://www.springframework.org/schema/beans http://www.springframework.org/schema/beans/spring-beans.xsd
                  http://www.springframework.org/schema/integration/file http://www.springframework.org/schema/integration/file/spring-integration-file.xsd
                  http://www.springframework.org/schema/integration http://www.springframework.org/schema/integration/spring-integration.xsd
                  http://www.springframework.org/schema/integration/jmx http://www.springframework.org/schema/integration/jmx/spring-integration-jmx.xsd">

    <bean class="org.springframework.beans.factory.config.PropertyPlaceholderConfigurer" id="corePlaceHolder">
        <property name="ignoreUnresolvablePlaceholders" value="true"/>
        <property name="locations">
            <list>
                <value>classpath:/conf.properties</value>
            </list>
        </property>
    </bean>

    <bean id="mbeanServer" class="org.springframework.jmx.support.MBeanServerFactoryBean">
        <property name="locateExistingServerIfPossible" value="true"/>
    </bean>

    <int-jmx:mbean-export default-domain="fr.jetoile.sample" server="mbeanServer"/>

    <int:message-history/>
    ...
</beans>
On y remarque la lecture du fichier de configuration, ainsi que les activations jmx adéquate afin d’avoir un peu d’informations ;-) Concernant l’élément message-history, cela permet de préciser à Spring Integration d’ajouter dans les headers du message (qui, pour rappel, transite via les Pipes entre les différents Filters) des informations de temps d’exécution.
En soit, il s’agit d’une configuration extrèmement simple pour toute personne connaissant un minimum Spring Integration, donc encore une fois, rien de compliqué… ;-)
Gateway Spring Integration
Afin de rentrer dans le vif du sujet, ce paragraphe montrera comment il est possible de transformer notre petit serveur Resteasy-Netty4 en une Gateway Spring Integration.
Pour ce faire, il suffit de définir une interface (NettyGateway) qui sera utilisée par Spring Integration. Ci dessous un petit extract de la documentation officielle :
Le rôle principale d’une Gateway est de chacher l’API de messaging fournit par Spring Integration. Cela permet à la logique business de l’application de s’abstraire complètement de l’API de Spring Integration et, en utilisant une Gateway générique, le code n’interagit qu’avec une simple interface.
…
En fait, Spring Integration fournit un GatewayProxyFactoryBean qui génère un proxy pour n’importe quelle interface et qui, en interne, invoque la méthode de la Gateway. Ainsi, en utilisant l’injection de dépendance, il est possible d’exposer l’interface aux méthodes business.
public interface NettyGateway {
    void send(DtoRequest msg);
}
Ainsi, notre service REST se présentera comme suit :
@Path("/sample")
public class SimpleService {

    private NettyGateway messageProducer;

    public void setGateway(NettyGateway messageProducer) {
        this.messageProducer = messageProducer;
    }

    @POST
    @Path("/write")
    @Consumes(MediaType.APPLICATION_JSON)
    public Response write(DtoRequest message) {
        this.messageProducer.send(message);
        return Response.ok().build();
    }
}
On y constatera que l’inteface NettyGateway lui a été injecté afin qu’il puisse servir de passe plat.
Coté Spring, la configuration est la suivante :
<int:gateway id="nettyGateway" service-interface="fr.jetoile.sample.gateway.NettyGateway"
                 default-request-channel="channel"/>

<bean id="simpleService" class="fr.jetoile.sample.service.SimpleService">
    <property name="gateway" ref="nettyGateway"/>
</bean>
Du coté de démarrage de notre serveur Resteasy-Netty4, cela ne sera, bien sûr, plus fait dans le main(), mais dans notre bean Spring à qui sera injectée notre classe implémentant notre service REST :
<bean id="nettyContainer" class="fr.jetoile.sample.gateway.NettyContainer">
    <constructor-arg ref="simpleService"/>
</bean>
Avec :
public class NettyContainer {

    private static final Logger LOGGER = LoggerFactory.getLogger(NettyContainer.class);

    public static final String CONF_PROPERTIES = "conf.properties";

    private static Configuration config;

    private SimpleService simpleService;

    public NettyContainer(SimpleService simpleService) {
        try {
            config = new PropertiesConfiguration(CONF_PROPERTIES);

        } catch (ConfigurationException e) {
            throw new IllegalArgumentException("bad config");
        }
        this.simpleService = simpleService;
        initServer();
    }


    private void initServer() {
        ResteasyDeployment deployment = new ResteasyDeployment();

        int nettyPort = 8081;

        if (config != null) {
            deployment.setAsyncJobServiceEnabled(config.getBoolean("netty.asyncJobServiceEnabled", false));
            deployment.setAsyncJobServiceMaxJobResults(config.getInt("netty.asyncJobServiceMaxJobResults", 100));
            deployment.setAsyncJobServiceMaxWait(config.getLong("netty.asyncJobServiceMaxWait", 300000));
            deployment.setAsyncJobServiceThreadPoolSize(config.getInt("netty.asyncJobServiceThreadPoolSize", 100));

            nettyPort = config.getInt("netty.port", TestPortProvider.getPort());
        } else {
            LOGGER.warn("is going to use default netty config");
        }

        deployment.setResources(Arrays.<Object>asList(simpleService));

        MyNettyJaxrsServer netty = new MyNettyJaxrsServer();

        netty.setDeployment(deployment);
        netty.setPort(nettyPort);
        netty.setRootResourcePath("");
        netty.setSecurityDomain(null);
        netty.start();
    }
}
Et voilà… c’est tout!
Ne reste plus que la classe implémentant notre main() qui ne fera que charger le contexte spring :
public class Client {
    public static void main(String[] args) throws ConfigurationException {
        new ClassPathXmlApplicationContext("springintegration-config.xml");
    }
}
Juste un dernier point : le lecteur un peu concentré aura remarqué qu’il y a, ici, un petit meli melo dans la lecture des fichiers de configuration (parfois chargé par Spring, parfois chargé via commons-configuration). Je laisse cependant ces points en suspens et à la discrétion de la personne qui utilisera et lira cet article (ou qui aura atteint ce point…) (s’il y en a… ;-) ).
Intégration de Metrics
L’objectif de cet article étant de monter une stack “presque complète”, il est, bien sûr, primordial de fournir les bonnes métriques.
Comme dans mon article précédent, ce sera Metrics qui sera utilisé.
Cependant, alors que cela avait été fait programmatiquement, ce coup-ci, cela sera fait via Spring (parce que sinon ce n’est pas drôle… ;-) ).
Pour ce faire, c’est très simple, en tirant la dépendance ‘com.ryantenney.metrics’, name: ‘metrics-spring’, version:‘3.0.0-RC4’ au lieu de ‘com.codahale.metrics’, name: ‘metrics-core’, il ne reste qu’à ajouter à notre service REST l’annotation @Timed et d’ajouter dans la configuration Spring les éléments suivants :
@POST
@Path("/write")
@Consumes(MediaType.APPLICATION_JSON)
@Timed
public Response write(DtoRequest message) {
    this.messageProducer.send(message);
    return Response.ok().build();
}
Avec la configuration Spring suivante :
<?xml version="1.0" encoding="UTF-8"?>
<beans xmlns="http://www.springframework.org/schema/beans"
       xmlns:int="http://www.springframework.org/schema/integration"
       xmlns:file="http://www.springframework.org/schema/integration/file"
       xmlns:xsi="http://www.w3.org/2001/XMLSchema-instance"
       xmlns:metrics="http://www.ryantenney.com/schema/metrics"
       xmlns:int-jmx="http://www.springframework.org/schema/integration/jmx"
       xsi:schemaLocation="http://www.springframework.org/schema/beans http://www.springframework.org/schema/beans/spring-beans.xsd
                  http://www.springframework.org/schema/integration/file http://www.springframework.org/schema/integration/file/spring-integration-file.xsd
                  http://www.springframework.org/schema/integration http://www.springframework.org/schema/integration/spring-integration.xsd
                  http://www.springframework.org/schema/integration/jmx http://www.springframework.org/schema/integration/jmx/spring-integration-jmx.xsd
                  http://www.ryantenney.com/schema/metrics http://www.ryantenney.com/schema/metrics/metrics-3.0.xsd">

    <metrics:metric-registry id="metrics" />

    <metrics:annotation-driven metric-registry="metrics" />

    <metrics:reporter type="jmx" metric-registry="metrics" />
    ...
</beans>
Pour montrer que je ne mens pas, on a donc (ici, utilisation de Hawt.io via Jolokia) :
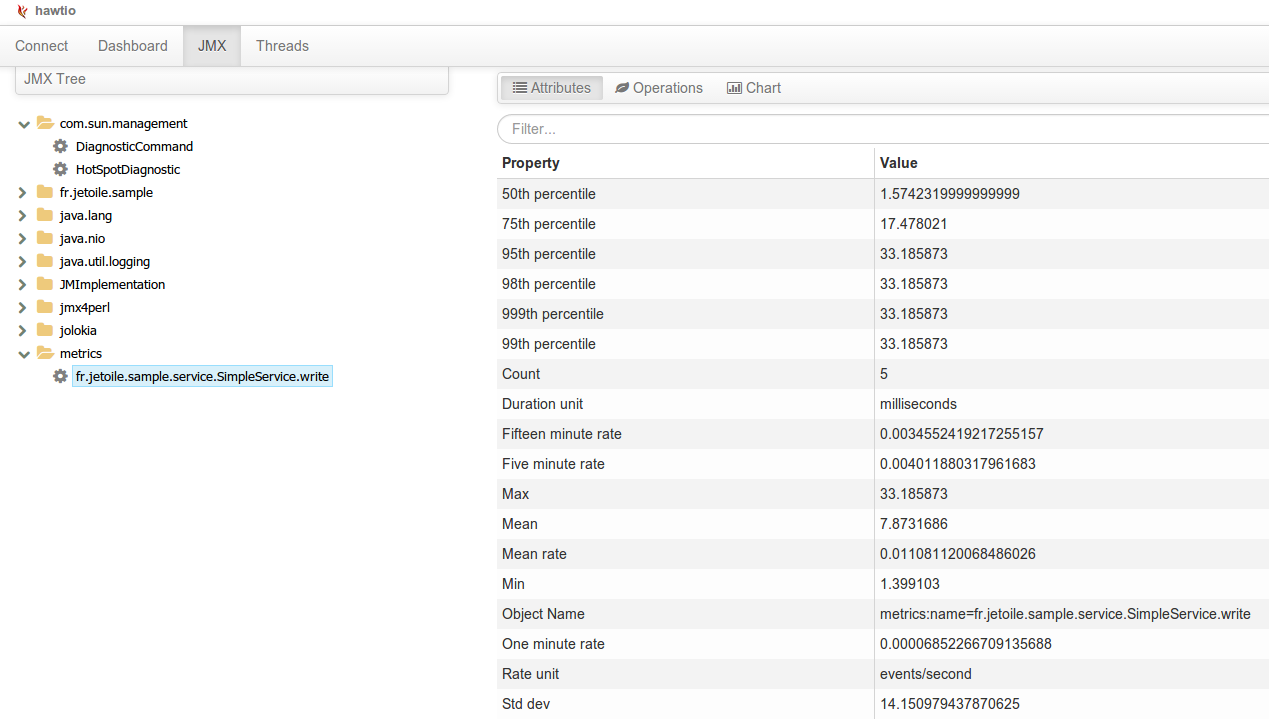
On constate encore une fois la simplicité de la chose!
Intégration de Jolokia
De même que pour notre paragraphe précédent, l’intégration de Jolokia se fera ici par configuration Spring plutôt que de manière programmatique.
Pour ce faire, il suffit de tirer la dépendance ‘org.jolokia’, name: ‘jolokia-spring’, version:‘1.1.2’ au lieu de ‘org.jolokia’, name: ‘jolokia-jvm’, et d’ajouter le bon bean à Spring :
<?xml version="1.0" encoding="UTF-8"?>
<beans xmlns="http://www.springframework.org/schema/beans"
       xmlns:int="http://www.springframework.org/schema/integration"
       xmlns:file="http://www.springframework.org/schema/integration/file"
       xmlns:xsi="http://www.w3.org/2001/XMLSchema-instance"
       xmlns:metrics="http://www.ryantenney.com/schema/metrics"
       xmlns:int-jmx="http://www.springframework.org/schema/integration/jmx"
       xmlns:jolokia="http://www.jolokia.org/jolokia-spring/schema/config"
       xsi:schemaLocation="http://www.springframework.org/schema/beans http://www.springframework.org/schema/beans/spring-beans.xsd
                  http://www.springframework.org/schema/integration/file http://www.springframework.org/schema/integration/file/spring-integration-file.xsd
                  http://www.springframework.org/schema/integration http://www.springframework.org/schema/integration/spring-integration.xsd
                  http://www.springframework.org/schema/integration/jmx http://www.springframework.org/schema/integration/jmx/spring-integration-jmx.xsd
                  http://www.jolokia.org/jolokia-spring/schema/config http://www.jolokia.org/jolokia-spring/schema/config/jolokia-config.xsd
                  http://www.ryantenney.com/schema/metrics http://www.ryantenney.com/schema/metrics/metrics-3.0.xsd">

    <bean class="org.springframework.beans.factory.config.PropertyPlaceholderConfigurer" id="corePlaceHolder">
        <property name="ignoreUnresolvablePlaceholders" value="true"/>
        <property name="locations">
            <list>
                <value>classpath:/conf.properties</value>
            </list>
        </property>
    </bean>

    <jolokia:agent lookupConfig="true" systemPropertiesMode="never">
        <jolokia:config
                autoStart="true"
                host="${jolokia.host}"
                port="${jolokia.port}"
                user="${jolokia.user}"
                password="${jolokia.password}"/>
    </jolokia:agent>
    ...
</beans>
Et… c’est tout… Jolokia est intégré à notre petite stack.
Intégration de Swagger
Concernant l’intégration de Swagger, cela ne diffère en rien de mon article précédent. Même problème de CORS, même hack…

Branchement des plugins Maven Appassembler et Assembly
De même que pour Swagger, rien à signaler de particulier par rapport à mon article précédent… cela fonctionne sans problème ;-)
Conclusion
En conclusion, on peut constater que l’intégration de Spring integration dans notre petite stack est tout aussi trivial que le reste!
Encore une fois, simple et efficace ;-)
Ainsi, on peut bénéficier du meilleur des deux mondes.
Bien sûr, on peut se poser la question de l’intérêt de brancher quelques choses de véloce (Netty) avec un framework succeptible d’entrainer un Overhead (spring integration) et qui serait, alors, le point de contension. La question est légitime mais je n’y répondrai pas… ;-) (pour bien faire, il faudrait faire un benchmark).